What’s the most used training aid in a tour pros bag?
Or in lessons given by the top instructors in the world?
It’s more popular than doppler radars, and even an iPhone camera.
Since you read the title of this post, you know I’m talking about alignment sticks. Simple, versatile, and affordable. You can find them at any hardware store for under $5, and you’ll find every good player has them in their bag.
So how can they help you with your game?
SETUP BASICS: Ball Position, Stance Width, Alignment
The most common way players use alignment sticks is to check their setup basics. Ball position, alignment, and stance width are often overlooked points. But these 3 have a huge effect on your golf swing, and ball flight. Beginner golfers often move on from the basics too quickly. While experienced golfers always go back to these simple setup checkpoints.
Check your ball position and stance width with an alignment stick on the ground, between your feet. Point it straight at the ball. I teach students to put both feet together, one on each side of the alignment stick. Then take a small step with their lead foot, and then their trail foot.

Vary the size of each step to adjust your stance width and ball position. Equal sized steps with each foot, will lead to a centered ball position. While taking a smaller step with your front foot will move the ball position more forward. A smaller step with the back foot will move the ball position more backward.
You can also use the size of your step to adjust the stance width for different clubs. In general, the smaller the shot, the narrower the stance. So, for a chip or wedge shot, your feet will stay closer together than for a driver or wood.
To use it for aim and alignment, place the alignment stick between you and the ball, pointing at your target. I also recommend using two alignment sticks, one on each side of the ball. This helps visualize your club path. It paints the image of “railroad tracks” pointing straight at your target.


You can use training aids like The Golf Boks to work on ball position, stance width, and alignment all at once. Insert an alignment stick through one of the holes in the bottom of the Boks and point it at your golf ball. Point the long edge of the Boks at your target. Use the graphics on the Boks to keep a consistent ball position and stance width.

SWING PLANE: Inside Takeaway, Over the Top
Another common way golfers use alignment sticks is to improve their swing plane.
Swing plane is the path your clubhead and shaft follow in the backswing and downswing. It closely matches the lie angle of your shaft at setup. Shorter clubs like wedges have a steeper swing plane. Longer clubs like your driver and woods have a flatter swing plane.
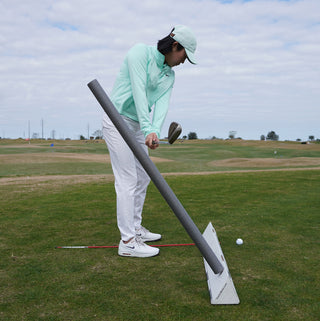
If you’re practicing on grass, place an alignment stick angled in the ground. About 3 feet back from your ball, just inside the heel of your club, and matching your club’s lie angle. This is a great way to ensure that you avoid a takeaway that comes inside too early. An inside takeaway is very common for beginner golfers. Often (but not always) it leads to an exaggerated over the top move, and a slice.

I tell my players to practice the feeling of the hands coming “in” while the club head stays “out”.
“Hands in, club out”

Getting the takeaway right sets you up to a swing with less manipulation.
The second common swing plane fault that players use an alignment stick to work on is an over-the-top move.
This is when a players club path comes in over, or steeper, than the swing plane for the club they’re using. This is usually coupled with an open club face. Combined you get loss of distance, big curves in your shots, inconsistent contact. Maybe even dreaded shanks.
There’s a couple of ways to setup alignment sticks to stop coming over the top.
For my students, I set it up like the inside takeaway drill, except I put the stick on the outside of the toe of the club. Again, place it about 3 feet back from your ball and matching your clubs lie angle. If you want to exaggerate this move, you can make it a little flatter than the lie angle.


For safety, anytime an alignment stick can be hit in your downswing, slide a foam noodle over the stick.
If you’re indoors or want an easy station to move around on the range, the Golf Boks will help you setup an alignment stick practice station. It has prepunched holes for all the common angles you need. As a bonus it comes with a foam noodle included so you can feel safer while practicing a new move.
HIP SWAY
Hip sway is the side to side motion of the hips throughout the swing. They either move away from the target or towards.
Common faults are swaying too far away from the target in the backswing or too far towards it in the downswing. Swaying too much back in the backswing leads to a reverse spine angle at the top of this swing. This specific movement pattern makes it hard to rotate, usually leads to an over the top move and a big loss of power.
Swaying too much towards the target in the downswing can lead to the upper body tipping back too much. This can quickly turn into blocks, hooks, and chunky shots hitting the ground before the ball.
This doesn’t mean that we don’t want any lateral motion throughout the swing. But, we want to create a more functional pattern. Hip sway plays a big role in power production as well as tempo and timing.
To create a functional pattern we want the hips to sway less than an inch away from the target in the backswing. Then about 4-6 inches towards the target in the downswing.
To nail this you need to setup an alignment stick that’s just outside of your trail side hip. Then a second stick about a fist width ahead of your lead side hip at setup. This creates a good amount of space to control the sway while adding hip rotation.

The Golf Boks is one of the only training aids that can help you get this practice set up right. With three alignment sticks and the Boks you can set up an alignment stick on both sides of your hips. Whether you’re practicing off grass, mats, or just doing dry drills at home. You can also check your ball position, stance width, and alignment while working on your hip sway.
CONCLUSION
With so many different ways to use alignment sticks, it’s easy to see why they are such a popular training aid. Pick some up today, and use them during every practice. Nail your setup. Create a practice station that gives you feedback. Practice often. You're sure to improve your swing and lower your scores.
Happy golfing!